How to Reset Your Browser Cache in Firefox and Chrome: A Step-by-Step Guide
In the digital age, browsers like Firefox and Chrome have become essential tools for accessing the internet. Over time, these browsers store data such as images, scripts, and other elements from websites you visit. This stored data, known as the cache, helps websites load faster on subsequent visits. However, an overloaded or corrupted cache can lead to various issues, including slow browser performance, outdated content, or even website loading errors. Resetting your browser cache can resolve these problems and ensure a smoother browsing experience.
In this comprehensive guide, we’ll walk you through the process of clearing the cache in both Firefox and Chrome browsers.
Table of Contents
- Understanding Browser Cache
- Why Reset Your Browser Cache?
- Resetting Browser Cache in Firefox
- Resetting Browser Cache in Chrome
- Additional Tips
- Conclusion
Understanding Browser Cache
Before diving into the reset process, it’s essential to understand what browser cache is and how it works.
Browser Cache is a temporary storage location on your computer where your browser saves files from websites you visit. These files include images, JavaScript, CSS, and other components necessary for loading web pages. By storing these elements locally, browsers can reduce the amount of data they need to download on subsequent visits, leading to faster page loading times and reduced bandwidth usage.
However, cached data can sometimes become outdated or corrupted, leading to various browsing issues. Clearing the cache forces the browser to retrieve fresh copies of these files, potentially resolving problems like:
- Websites not loading correctly
- Outdated content being displayed
- Increased data usage
- Slower browser performance
Why Reset Your Browser Cache?
Resetting your browser cache can help in several scenarios:
- Troubleshooting Website Issues: If a website isn’t loading properly or displaying outdated information, clearing the cache can force the browser to fetch the latest version of the site.
- Improving Browser Performance: An overloaded cache can slow down your browser. Clearing it can free up space and enhance performance.
- Fixing Errors: Sometimes, corrupted cache data can cause errors. Resetting the cache can resolve these issues.
Resetting Browser Cache in Firefox
Follow these steps to clear the cache in Mozilla Firefox.
Step 1: Open Firefox Settings
- Launch Firefox on your computer.
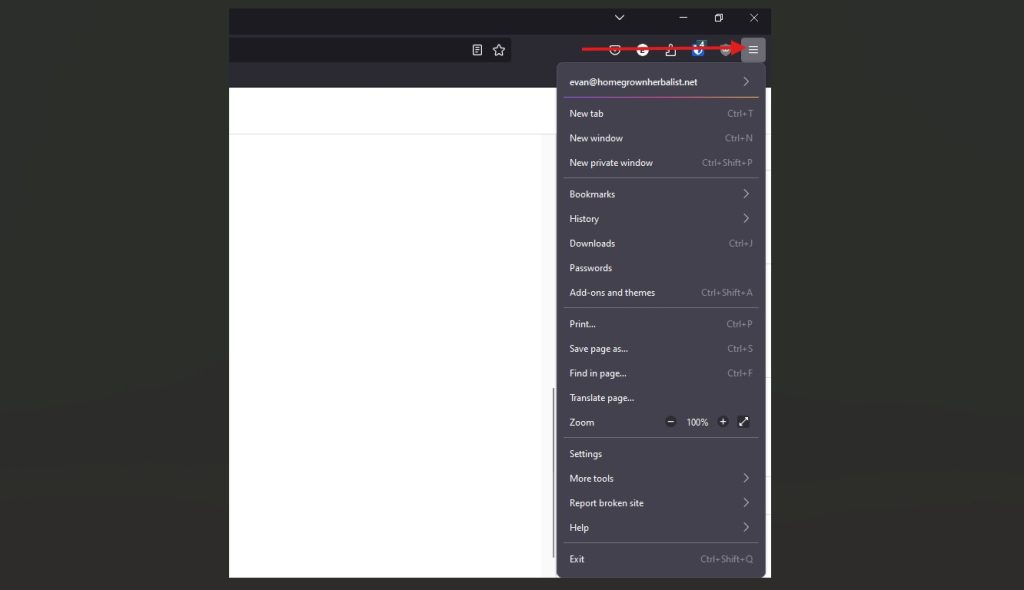
- Click on the three horizontal lines (Menu button) in the top-right corner of the browser window.
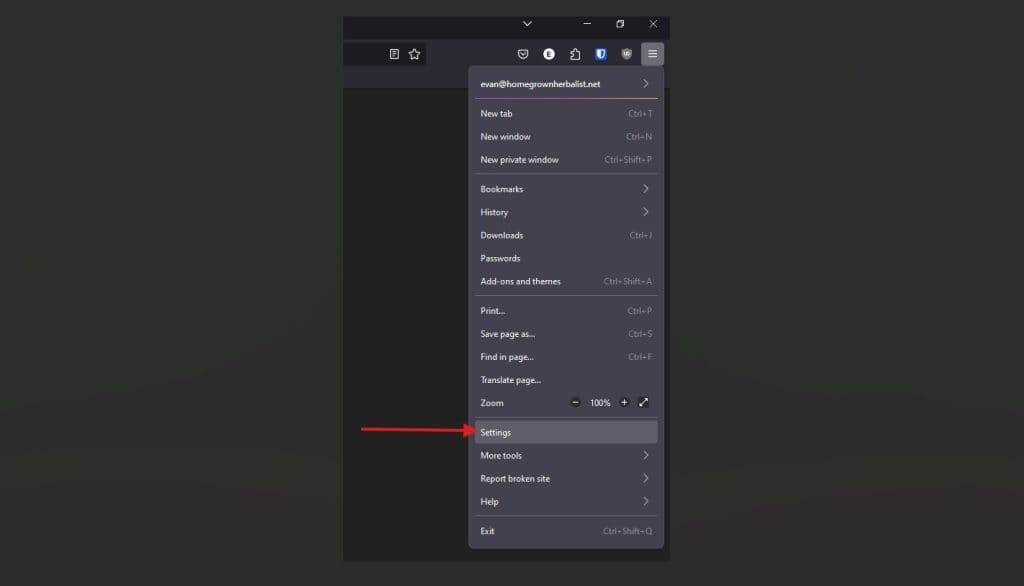
- From the dropdown menu, select “Settings”.
Step 2: Navigate to Privacy & Security
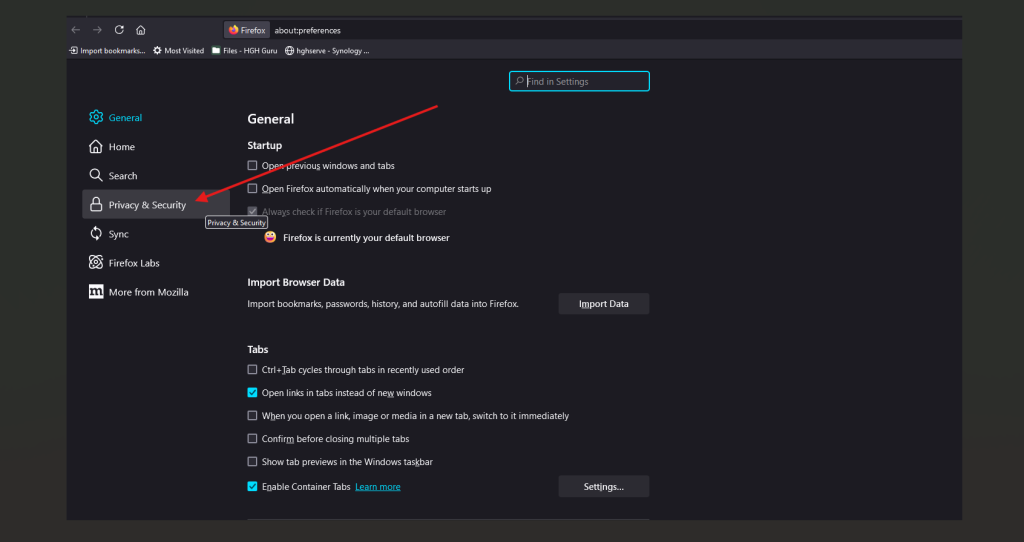
- In the Settings tab, look at the left-hand sidebar.
- Click on “Privacy & Security”.
Step 3: Clear Cached Web Content
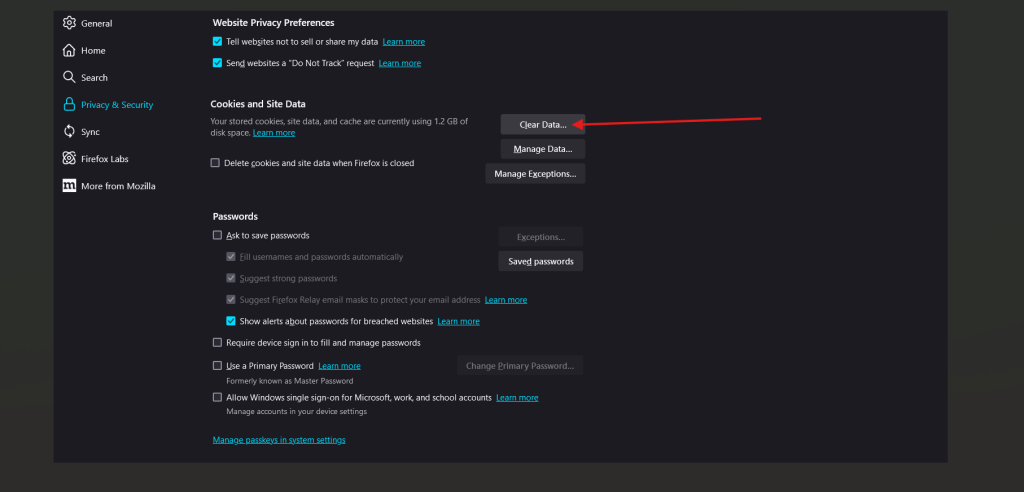
- Scroll down to the “Cookies and Site Data” section.
- Click on the “Clear Data…” button.
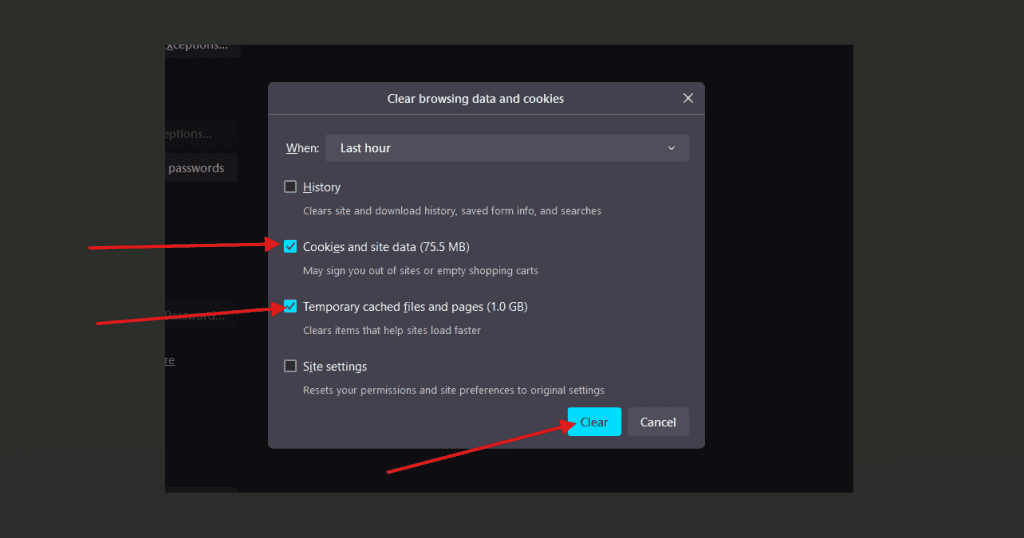
- A popup will appear with a few options, the two importation options are:
- Cookies and Site Data
- Temporary cached files and pages
- Ensure that “Temporary cached files and pagest” is checked. You can uncheck “Cookies and Site Data” if you only want to clear the cache.
Step 4: Confirm Cache Clearance
- After selecting “Cached Web Content”, click the “Clear” button.
- Firefox will clear the cached data.
- Close the Settings tab. Your cache has now been reset.
Resetting Browser Cache in Chrome
Follow these steps to clear the cache in Google Chrome.
Step 1: Open Chrome Settings
- Launch Chrome on your computer.
- Click on the three vertical dots (More button) in the top-right corner of the browser window.
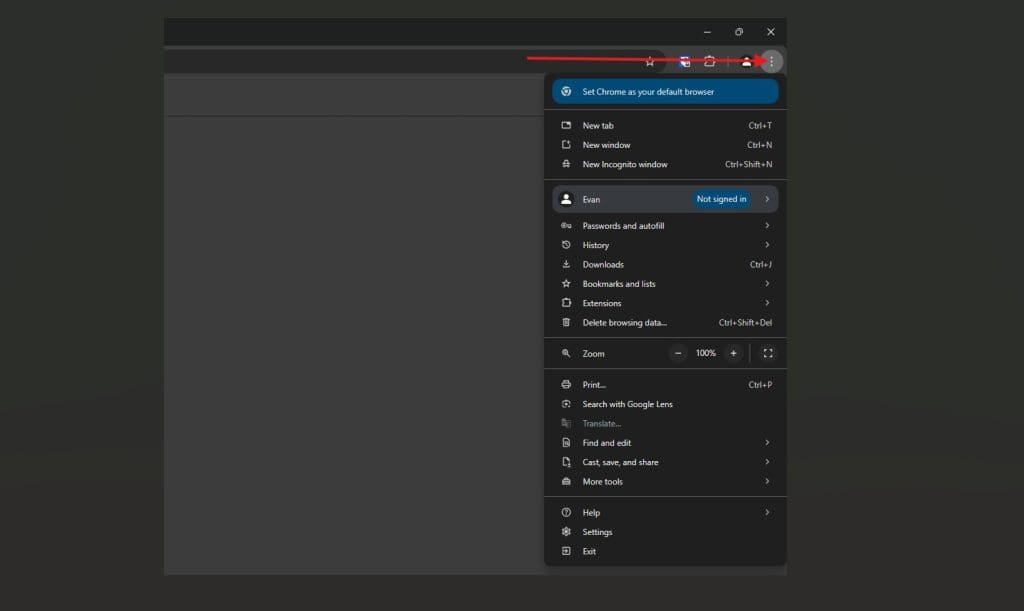
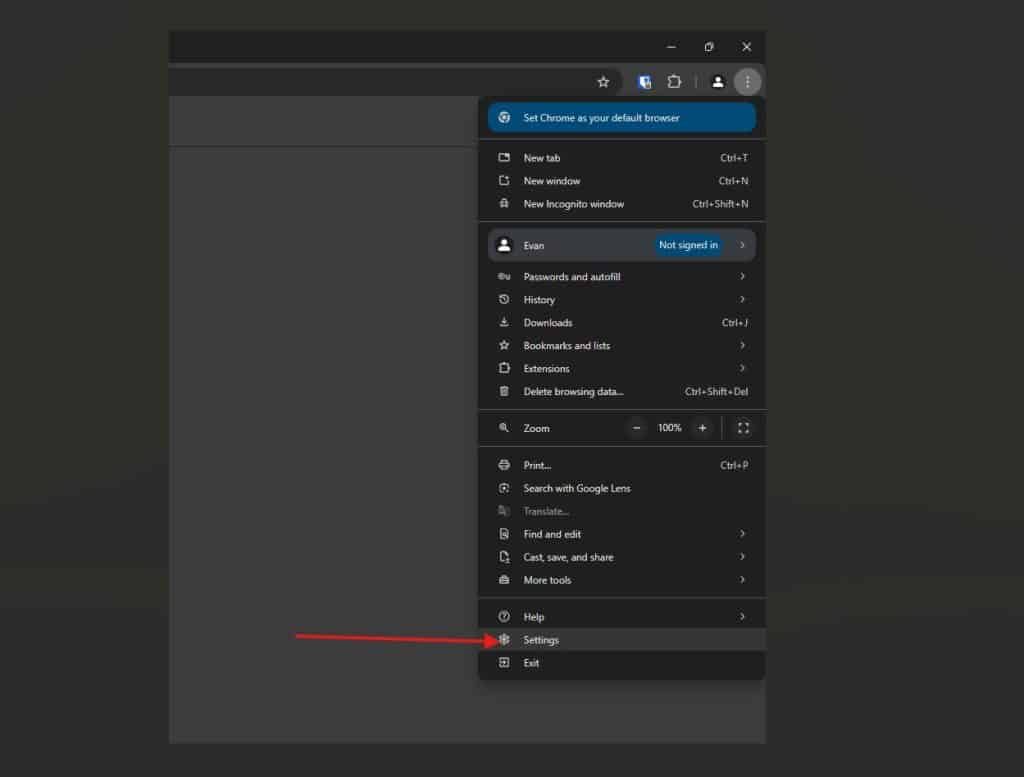
- From the dropdown menu, select “Settings”.
Step 2: Navigate to Privacy and Security
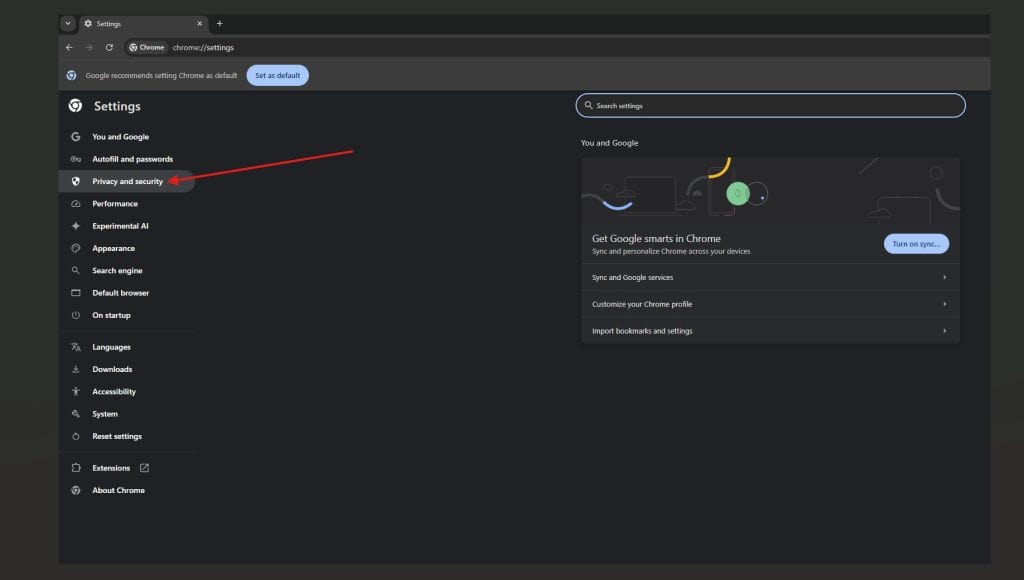
- In the Settings tab, locate the left-hand sidebar.
- Click on “Privacy and security”.
Step 3: Clear Browsing Data
- Under the “Privacy and security” section, click on “Delete browsing data”.
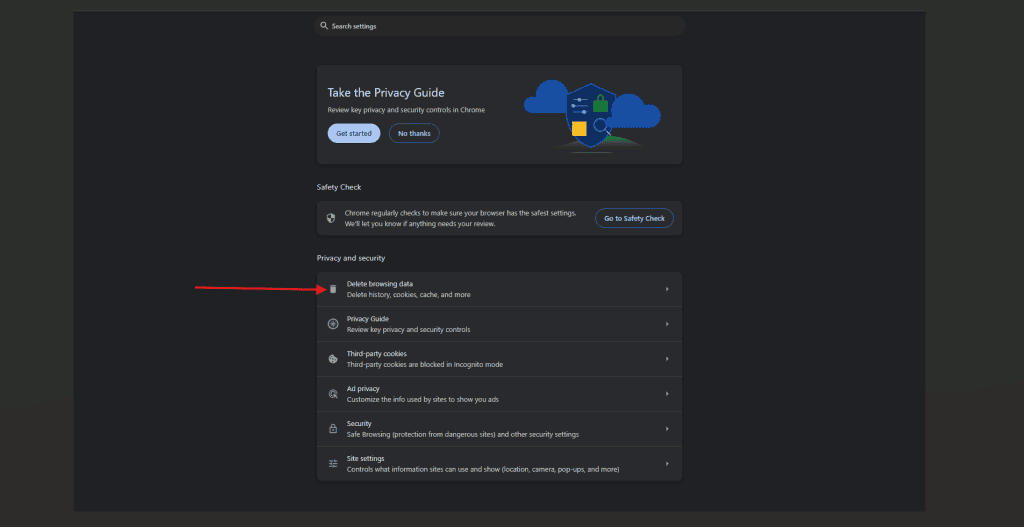
Step 4: Select Cached Images and Files
- A popup will appear with two tabs: “Basic” and “Advanced”.
- Under the “Basic” tab:
- Ensure that “Cached images and files” is checked.
- You can uncheck other options if you only want to clear the cache.
- Alternatively, for more control, switch to the “Advanced” tab and select additional options as needed.
Step 5: Clear Data
- After selecting the desired options, click the “Delete data” button.
- Chrome will begin clearing the cached data. The time taken will depend on the amount of data stored.
- Once completed, the popup will close, and your cache has been reset.
Additional Tips
- Shortcut Methods: Both Firefox and Chrome offer keyboard shortcuts to access the cache clearing options quickly.
- Firefox: Press
Ctrl + Shift + Delete(Windows/Linux) orCmd + Shift + Delete(Mac) to open the Clear Recent History window. - Chrome: Press
Ctrl + Shift + Delete(Windows/Linux) orCmd + Shift + Delete(Mac) to open the Clear Browsing Data dialog.
- Firefox: Press
- Regular Maintenance: Clearing your cache periodically can help maintain optimal browser performance and ensure you’re viewing the most recent versions of websites.
- Private/Incognito Mode: Browsing in private or incognito mode doesn’t use the existing cache and doesn’t save new cache data once the session ends. This can be useful if you want to avoid cache-related issues without manually clearing the cache.
- Browser Extensions: Some extensions can help manage cache more efficiently, offering automated or more granular control over cached data.
Fin.
Resetting your browser cache in Firefox and Chrome is a straightforward process that can resolve various browsing issues and enhance performance. Whether you’re experiencing slow page loads, outdated website content, or other glitches, clearing the cache is a simple first step in troubleshooting. By following the step-by-step instructions outlined in this guide, you can ensure a smoother and more efficient browsing experience.
Remember to periodically clear your cache and perform regular browser maintenance to keep your online activities running seamlessly. If problems persist after clearing the cache, consider seeking further assistance or exploring additional troubleshooting steps.
Feel free to reach out in the student forum if you have any questions or need further assistance with resetting your browser cache!

Thanks for the clearing cache tutorial, very helpfull.